
5 Quick Tips to Getting Started with Sketchup Layout

If you use sketchup, create presentations, and care at all about efficiency, Sketchup Layout is an awesome tool that fulfills all three of those categories. But if you’re anything like me, the first time you opened up Layout , you expected there to be finished presentations of your sketchup model ready to go. “Or maybe just with a click or two?” But no luck with that either.
Recently at my 9-5 we decided to enter the PlayHouzz competition. It seemed like the perfect opportunity for me to dive back into Layout, and after just a little bit of refamiliarization, I was up and running. Through working on this project, I’ve come up with 5 quick tips to help you get started with Sketchup Layout.
#1 AND…. Scene
The most fundamental part of creating a presentation using Layout is creating scenes within your model. You can bring up the scene window at Window > Scenes.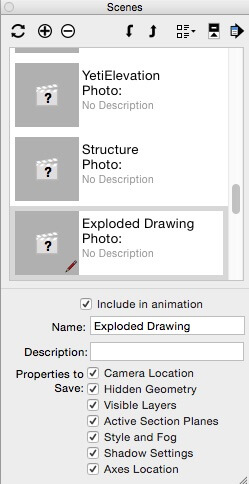 If you need to know more about how to create scenes checkout this tutorial.
Once you have the scenes in your model set, within Layout go to File>Insert and navigate to your sketchup file in the browser. Click on your blank paper in Layout and a new viewport will display. You can change the viewport to your scene by right clicking on the new viewport and scrolling down to Scenes in the menu. Get used to using the Window>Sketchup Model toolbar as well.
Pro Tip 1: If you effectively want to crop your viewport make sure that “Preserve Scale On Resize” is checked within your Window>Sketchup Model toolbar.
Pro Tip 2: Hold shift when scaling/cropping your viewports to uniformly scale/crop them.
Pro Tip 3: A quick way to get things setup is to copy (ctrl+c or cmd+c) the original viewport for as many scenes as you’re going set up, then change each one to the correct scene.
#2 Le’me work it
Once I’ve created scenes in a sketchup model, I have the habit of using them to navigate around the model. Why model more than you’re going to see in each scene right? But what happens is that the animations between scenes and display styles start to bog down the computer. That’s why I uncheck “include in animation” and create a “Working” scene that only has the “style and fog” & “shadow settings” properties saved to it.
Before saving your new “Working” scene, turn shadows off, and select one of the default Window>Styles that has a green stopwatch on it. This stopwatch indicates a Fast Style that will allow you to work quickly.

#3 All auto, all the time
We’re human and we make mistakes. (As an aside, one of my favorite things is looking through big-company catalogues and finding spelling, grammatical, and graphic errors.) Consequently, I try to remove myself (and my errors) from the equation whenever possible.
Thankfully, Layout has some things built into it that allow you to essentially, set it and forget it.
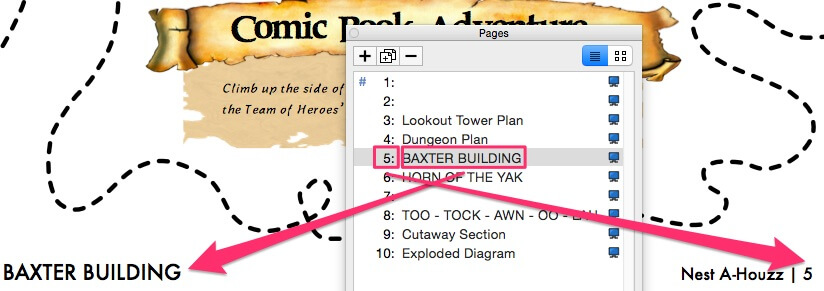
In the above image, the title and number that are set within the Pages toolbar are being pulled to the actual layout by using the commands <PageName> and <PageNumber>.
There’s a list of auto-text commands in Sketchup Layout under File>Document Setup>Auto-Text. This area also allows you to customize the auto-text commands and create your own.
#4 Layer guru
When you create a new Layout file, you’ll be given 2 layers to start “On Every Page” and “Default”. “On Every Page” is essentially your template layer. Whatever you put here is going to… show up on every page. This is where I put those auto-text features I mentioned above. The default layer should be what you use to customize each page (IE your viewports and line work).
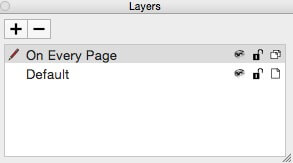
One thing to note about the layers is that their order in the list is also the order they display on your screen. In the case above, items “On Every Page” will always show up on top of items put on the default layer. If you need to resort this, it’s as simple as clicking and dragging them to where they need to go
#5 Leave the pretty stuff for last
The first thing to do when you’re starting a presentation is to just get everything in that you need. You want to have a general ballpark and then refine as you go. Trying to fully build out each page one-by-one is a waste of time and destroys the process of designing your presentation (see more tips like this in my ebook Secrets of Award Winning Architecture Presentations)
Pull any extra images, like silhouettes or what-have-you, in as .png files with transparency. This will let you layer most-effectively.
You can also create clipping masks with images and Layout shapes. To do this, draw a closed layout shape. You can use the shortcut “L” to start drawing a line and create a closed shape from that. Position your shape over the image in the location you’d like to clip. Select both the image and the shape, right click, and select create clipping mask from the drop-down menu.
The Possibilities with Sketchup Layout
If you’re interested in seeing the entire presentation we put together using Sketchup Layout, you can view our entry by going to www.designerhacks.com/play. If you’d like to see it built, please give it a like. The project with the most likes will be given the funds to build their design for the AIA convention this year.
Interested in more sketchup tutorials like this one? Checkout our sketchup tutorial library.
Great Post!
I recently started using Layout at work for concept work and presentation. My two favorite features are reloading the live SketchUp files and the ease of scaling scenes to architectural/engineering.
Layout is a neat hybrid program for layout, illustration and documentation – worth looking into if you haven’t before.