How to Create a Clipping Mask in Photoshop

Creating a clipping mask in photoshop is a great way to save time and create neat effects, but it can get a bit tricky. I’ve found myself clicking all over the place in an attempt to get masks to work. To streamline the process I’ve created this photoshop tutorial as an introduction to masking.
What is a clipping mask?
Clip masking is when objects on one layer are set to hide (or reveal) objects on another layer. You can think of a mask like a sheet of paper that you used an X-Acto blade on to cut out a shape. You then can use that X-acto’d sheet of paper (the mask) to reveal portions of anything you’re looking at.

While the above analogy might help illustrate the concept of a clipping mask, they’re actually more dynamic than that. In fact, clipping masks in photoshop can be set to have transparency so that a percentage of the mask can be revealed.
How to make a clipping mask
- The first thing you’ll need to do to create the shape you wish to mask with. We created some vector text using the horizontal type tool.

- Next you’ll need to import the image you want to clip. You can do this by opening your image in photoshop, hitting ctrl+a to select all, ctrl+c to copy, and then going to your working file tab and hitting ctrl+v to paste.
- After pasting you’ll have a new layer. Make sure that your image is ordered above the text (or shape) layer.

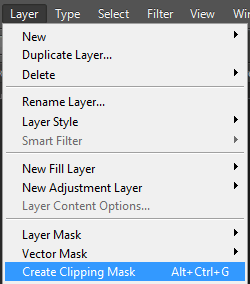
- With the image layer selected, go to Layer > Create Clipping Mask. Alternatively, you can use ctrl+alt+g as a shortcut. If you plan on having a bunch of images to shape, the shortcut will save you a ton of time. Make sure to use it!

- Now your image has been clipped to your shape and you can manipulate the image layer or shape layer independently! Trust me, being able to edit these after the first draft of your design will be a huge lifesaver in the long run. One thing I’ve learned is that things are rarely right on the first time. Pay yourself forward.

How you can use clipping masks when designing?
- As shown in this photoshop tutorial, layer masks are great for creating images shaped into text
- When you want images formed into any shape, this is a great method to use. It will allow you to keep everything fluid and editable.
- If you want to create a nice sharp edge to merge two photos together, this is one way to do that.
What other ways can you think of using clipping masks? Leave a comment below!

No comments yet.